Ubuntu App Filesystem location in Windows

Ubuntu App can be installed in Windows from the windows store.
Different other linux flavours are also available for download here.

To access the file system of this ubuntu system from windows, the following path needs to be looked into:

%userprofile%\AppData\Local\Packages

The above directory can be accessed in windows file system location:

Run JNLP Program

JNLP

Java Web Start (also known as JavaWS, javaws or JAWS) is a framework developed by Sun Microsystems (now Oracle) that allows users to start application software for the Java Platform directly from the Internet using a web browser. Some key benefits of this technology include seamless version updating for globally distributed applications and greater control of memory allocation to the Java virtual machine.

Run jnlp files

Install the Iced Tea:

sudo apt-get install icedtea-netx icedtea-8-plugin

To run jnlp file, execute it by:

javaws /Directory/xyz.jnlp

Change iced tea settings:

itweb-settings

Known Issues on execution:

java.security.AccessControlException: access denied ("java.io.FilePermission" "/usr/bin/xprop" "execute")

https://dev.openecard.org/boards/2/topics/174

Reference:

https://en.wikipedia.org/wiki/Java_Web_Start

https://askubuntu.com/questions/18792/how-can-i-view-or-start-java-web-start-applications

Nvidia Drivers in Ubuntu

Check the driver which is being used for Nvidia card with the following command.

sudo lshw -c display

You can also use video instead of display.

sudo lshw -c video

By default, the open source nouveau driver is being used for Nvidia card.

Run the following command to list available driver for your Nvidia card from the default Ubuntu repository.

sudo ubuntu-drivers devices

install the recommended driver, run the following command.

sudo ubuntu-drivers autoinstall

If you want to install a particular driver, run the following command.

sudo apt install nvidia-driver-version-number

For example:

sudo apt install nvidia-driver-340

After the driver is installed, Reboot the computer to enable nvidia-prime, which is technology to switch between Intel and Nvidia graphics card.

sudo shutdown -r now

Now the proprietary Nvidia driver is being used.

sudo lshw -c display

Removing Nvidia Drivers

Search what packages from nvidia you have installed.

dpkg -l | grep -i nvidia

Nvidia-common package has a dependency on ubunut-desktop.

To purge everything related to nvidia you can give this command

sudo apt-get remove --purge nvidia-*

Above command will also remove the nvidia-common package and the nvidia-common package has as a dependency the ubuntu-desktop package.

So after above command you should also give the installation command for ubuntu-desktop package

sudo apt-get install ubuntu-desktop

Also sometimes the nouveau driver get blacklisted from nvidia driver. With purge command it should UN-blacklisted. If you want to be sure that nouveau will be load in boot, you can force-load it by add it to /etc/modules

echo 'nouveau' | sudo tee -a /etc/modules

Last , search for the xorg.conf file and remove it as well

sudo rm /etc/X11/xorg.conf

In summary

sudo apt-get remove --purge nvidia-*
sudo apt-get install ubuntu-desktop
sudo rm /etc/X11/xorg.conf
echo 'nouveau' | sudo tee -a /etc/modules

LightDm install directory missing

t is possible that the folder /var/lib/lightdm has not been created.

You could try: mkdir -p /var/lib/lightdm; chown -R lightdm:lightdm /var/lib/lightdm ; chmod 0750 /var/lib/lightdm with root permission if needed.

Reference:
https://www.linuxbabe.com/ubuntu/install-nvidia-driver-ubuntu-18-04
https://askubuntu.com/questions/692577/ubuntu-15-10-boot-hangs-when-starting-lightdm
https://askubuntu.com/questions/206283/how-can-i-uninstall-a-nvidia-driver-completely

Dev Null

Special device files
/dev/full
/dev/null
/dev/random
and /dev/urandom
/dev/zero

In some operating systems, the null device is a device file that discards all data written to it but reports that the write operation succeeded. This device is called /dev/null on Unix and Unix-like systems, NUL: or NUL on DOS and CP/M, nul on newer Windows systems (internally \Device\Null on Windows NT), NIL: on Amiga operating systems, and the NL: on OpenVMS. In Windows Powershell, the equivalent is $null. It provides no data to any process that reads from it, yielding EOF immediately. In IBM DOS/360, OS/360 (MFT, MVT), OS/390 and z/OS operating systems, such files would be assigned in JCL to DD DUMMY.

In programmer jargon, especially Unix jargon, it may also be called the bit bucket or black hole.

The null device is typically used for disposing of unwanted output streams of a process, or as a convenient empty file for input streams. This is usually done by redirection.

The /dev/null device is a special file, not a directory, so one cannot move a whole file or directory into it with the Unix mv command. The rm command is the proper way to delete files in Unix.

some command > /dev/null 2>&1

STDIN is represented by 0, STDOUT by 1, and STDERR by 2.

/dev/null is the bit-bucket: the place where you dump anything you don’t need.

By default:

stdin  ==> fd 0
stdout ==> fd 1
stderr ==> fd 2

In the script, you use > /dev/null causing:

stdin  ==> fd 0
stdout ==> /dev/null
stderr ==> fd 2

And then 2>&1 causing:

stdin  ==> fd 0
stdout ==> /dev/null
stderr ==> stdout

Reference: https://en.wikipedia.org/wiki/Null_device
https://unix.stackexchange.com/questions/119648/redirecting-to-dev-null

Install/Uninstall packages in Ubuntu from tar.gz

Unzip the tar.gz by using the compression/decompression program in your system.

The steps to make and build:

./configure 
make
make install
//Remove package
Make unistall

To remove the package make install is used. Sometimes if the unistall step is not mentioned in the make file, the removal of the installed package would get difficult and can even lead to a broken system.

To prevent this, instead of installing the package using make install, we can use the checkinstall utility available in the ubuntu repo. It cretaed a .deb package for the program. This .deb package can be easily removed using any package manager like apt, synaptic, dpkg, aptitude.

sudo apt install checkinstall
sudo checkinstall


Example to remove package after installing it through checkinstall.


**********************************************************************

 Done. The new package has been installed and saved to

 /home/ajinkyawavare/Downloads/scid_vs_pc-4.19/scid-vs-pc_4.19-1_amd64.deb

 You can remove it from your system anytime using: 

      dpkg -r scid-vs-pc

**********************************************************************

Shortcut Settings in Ubuntu

To see Unity shortcuts press and hold the Super key. To customize shortcuts open System settings ( gnome-control-center ), go to keyboard and select Shortcuts tab. Explore all the categories to find what you’re interested in changing and click on it to change. Then press the keys for your new shortcut.

Super Key –> Depends upon the keyboard. (Normal Windows keyboard –> Windows Key is the Super Key )

Divide the application screen area into half and share it among two applications on screen:
Shortcut: Ctrl + Super Key + <- / -> key depending upon the are which you choose for the current window.

Update sources.list

After updating ubuntu system, some of the repo’s are disabled by default.

In order to activate back these repo’s we can modify the sources.list file to activate all the disabled repo’s in one go.

The sources.list can be found in the following directory:

/etc/apt/sources.list

It needs sudo access. Uncomment all the repo’s you want to activate back.

Cheers!!

Python versions in Ubuntu

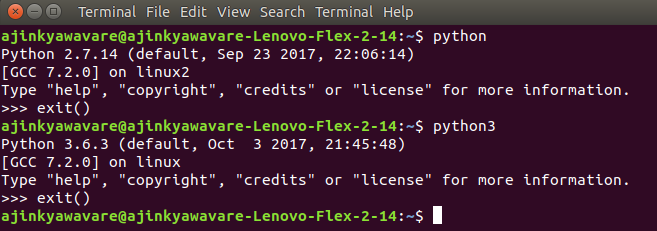
Ubuntu comes with both python versions 2.x and 3.x.
The default python version in ubuntu is 2.x

The python versions installed in ubuntu can be found using the below commands:
For both cases, to get out from Python shell, write:

 exit()

For installing python modules in python 2.x in ubuntu, use  :

pip

For installing python modules in python 3.x in ubuntu, use:

 pip3

Update setuptools in python

If package installation returns the following error:

python setup.py egg_info" failed with error code 1 in /tmp/xyz moduleName/

Use the below command to get the things working:

pip install --upgrade setuptools --user python

Using the --user python flag will resolve the error in --upgrade flag .

If you are using python3:

pip3 install --upgrade setuptools --user python


Ubuntu Snipping Tool

Unlike Windows, Ubuntu has a snipping tool of it’s own.

It’s named as gnome-screenshot.

Have a look at Screenshot. You can find it in Ubuntu Software.

http://apt.ubuntu.com/p/gnome-screenshot

However, there’s also a shortcut key associated in Ubuntu for taking snippets.

Hold down the Shift + PrtScn keys together.

Your mouse will change to a cross-like pointer.
Hold down your left-click key on the mouse and drag.

This uses gnome-screenshot behind the scenes.

You can change the keyboard shortcut via the regular keyboard settings.