In the Queue…

GSoC2016Logofever_logoFOSSASIA bring’s people together to share, create, develop and make things with Open Technologies and software. We organize science hack labs, Open Tech events, meetups and coding programs with developers, designers and contributors.
Checkout the FOSSASIA Idea’s page for more information.
(ˢᵒᶜⁱᵉᵗʸserver) aims to be a platform for developing collaborative applications.
sTeam server project repository: sTeam.

The GSOC 2016 unraveled so far…..

The Organizations were declared on 29th March 2016.
The Proposal Submission period was from 15th March-25th March 2016.

TimeLine

sTeam is a project under the organization FOSSASIA mentored by Martin Bähr.

Since then the activities done so far include:-

1.Installing the application on Linux Platform.

sTeam was successfully installed on Ubuntu 12.04, Ubuntu 14.04, Ubuntu 15.04 and CentOS 7.

2.Understanding the workflow of the application.
3.Bonding with the community on the IRC server irc.freenode.net channel #steam-devel and #fossasia.
4.Discussing and planning the enhancement idea’s with Mentor and associates.
5.Finding the possible area’s of application improvement.
6.Searching the archive’s to understand the platform more thoroughly.

The original website http://www.open-steam.org has been closed but the archives can still be accessed at : Archive of http://www.open-steam.org
Archive of http://server.open-steam.org
Archive of http://steamware.open-steam.org
http://societyserver.org/

7.Contributing to the project wiki.
Documenting the extracted information from the archives to the wiki pages categorically.
8.Reposting issues and solving them.

Issue’s reported : Issues.
Pull Requests : Pull Requests.

9.Writing a proposal and submitting it on the Google Dashboard.
10.Help other people to understand the application and guide them through the installation procedure.

After submitting the proposal, it’s the waiting period for the announcement of the students selected for GSOC 2016.
The selected students would be announced on 22nd April 2016.

A period filled with excitement and nervousness.
The one month period should be well utilized for the better understanding of the application by working on small bugs and staying interactive with other colleagues on IRC and work collaboratively.

Hoping to be selected for GSOC’16.
For the love of FOSS I look forward to contribute FOSSASIA organization by the Google summer of code platform or otherwise.
Finger’s crossed.
May the best candidates be selected for the event!!!
All the best to all the contestants participating in the event. :+1:

sTeam Project Implementation Idea’s

GSoC2016Logofever_logoFOSSASIA bring’s people together to share, create, develop and make things with Open Technologies and software. We organize science hack labs, Open Tech events, meetups and coding programs with developers, designers and contributors.
Checkout the FOSSASIA Idea’s page for more information.
(ˢᵒᶜⁱᵉᵗʸserver) aims to be a platform for developing collaborative applications.
sTeam server project repository: sTeam.

sTeam Implementations

The possible scenarios where sTeam can be used are described.

  • sTeam is good to build websites where people collaborate and communicate over documents.
  • sTeam Can be used as a knowledge sharing portal in schools or colleges where videos are streamed or the teacher gives a feedback on homework/assignments.
  • In offices for collaboration of files which are sent through the hierarchy to be reviewed and receive feedback.
  • It can also be used as a code collaboration platform with easy commands to move around and integrate code. (A commit/push github like implementation).
  • Multiple collaborators can edit document at once.( Keeping in mind the complications, this can be done by making use of timestamps and locks for concurrent access )

Feel Free to contribute your own idea’s about sTeam implementations.

sTeam Command Line

GSoC2016Logofever_logoFOSSASIA bring’s people together to share, create, develop and make things with Open Technologies and software. We organize science hack labs, Open Tech events, meetups and coding programs with developers, designers and contributors.
Checkout the FOSSASIA Idea’s page for more information.
(ˢᵒᶜⁱᵉᵗʸserver) aims to be a platform for developing collaborative applications.
sTeam server project repository: sTeam.

Why do we need command line for sTeam?

To access the server while it is running, inspect the data it has stored and make adhoc changes.

  • What utilities does sTeam command line provide to the user?It primarily provides proxy objects to the same objects in the server.
    Function calls on these objects are sent to the server and the result is sent back.
  • What dependencies do we need to execute the sTeam command line?The COAL protocol implementation is needed, which is part of the server code.
  • How to access the sTeam command line?run ./debug.pike in the tools directory (/usr/local/lib/steam/tools) of the server installation.
  • How to execute commands in the sTeam command line?Start with getting an object:
      me;  
      OBJ("/home/steam");  
      GROUP("steam");  
      USER("root");  
    

    Then call functions on that object.

  • What are the different commands which can be executed on the command line?Any function that the object supports.
    Check the source sTeam classes in /server/classes/
    In addition there are special function only available in the client, such as “create();”, which allow you to create new objects.
    Common function would be to “list Rooms;” , “List Gates;”.
  • How to use edit.pike?Run ./edit.pike Path to the created object. For eg. if a txt file is made with the address /home/steam/foobar.txt
 ./edit.pike /home/steam.foobar.txt
  • What errors can user face while running sTeam in command line mode?If you run a function that takes to many server resources, the connection drops.
  • What new features can be implemented in sTeam command line?See the Idea’s page

Enhancement Ideas For sTeam Platform.

GSoC2016Logofever_logoFOSSASIA bring’s people together to share, create, develop and make things with Open Technologies and software. We organize science hack labs, Open Tech events, meetups and coding programs with developers, designers and contributors.
Checkout the FOSSASIA Idea’s page for more information.
(ˢᵒᶜⁱᵉᵗʸserver) aims to be a platform for developing collaborative applications.
sTeam server project repository: sTeam.

Ideas for enhancement of tools of sTeam collaboration platform

These were the ideas which were mainly focused on during the development of sTeam commandline in GSOC’15.
Some of these idea’s were implemented during GSOC’15. More new utilities will be added to sTeam platform during the course of development in GSOC’16.
These are the various ideas on the enhancement of tools in sTeam collaboration platform collected from participants of GSOC’15.

1.)Adding users through command line.

2.)Desktop notification for mail incoming.

3.)Sending mails through command line.

4.)Implementing TLS with pike.

5.)Commandline IRC client to chat in a group.

6.)Make import-from-git script better.

7.)Implementing export-to-git script.

8.)Packaging to simplify deployment of sTeam

9.)creating groups; adding people to groups; requesting membership through commandline.

10.)Error-free installation of sTeam. (atleast add solutions to the error messages)

In edit.pike
11.)Support for text editors(other than vim) for remote editing of database contents.
12.)When doc is pike script, then compile it inside server. On fail, error should be presented to user.
13.)If edit client changes a document and is different, user should be alerted.

14.)Tab completion with debug supporting:

Remote sTeam objects
Object attributes
sTeam constants

15.)When sTeam closes, commandline hangs. This behaviour should be prevented and user should be automatically reconnected.

16.)Make debug client more interactive.

17.)Commands to show:

current location
list objects
list gates to other locations.

18.)Change location(enter a room,leave a room) and use objects.

sTeam (Structuring Information in a Team)

GSoC2016Logofever_logo
\FOSSASIA bring’s people together to share, create, develop and make things with Open Technologies and software. We organize science hack labs, Open Tech events, meetups and coding programs with developers, designers and contributors.
Checkout the FOSSASIA Idea’s page for more information.
(ˢᵒᶜⁱᵉᵗʸserver) aims to be a platform for developing collaborative applications.
sTeam server project repository: sTeam.

What is opensTeam?

sTeam (structuring information in a team) is an open-source environment for the structuring and maintenance of virtual knowledge spaces. It provides a wealth of different mechanisms to support communicative and cooperative learning and work processes.

arealstruktur


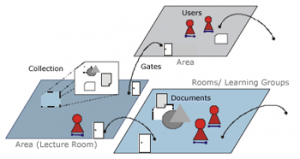
Virtual knowledge spaces combine synchronous and asynchronous forms of collaboration with the administration of hypermedia documents. Students and teachers meet in virtual knowledge areas, where they share and modify arrange, annotate and link documents through mutual views. This form of open, collaborative interaction with materials is supported by suitable methods of access permissions and user group management.

The main focus of sTeam is on techniques for distributed knowledge management and establishing of an arena for internet-based methods of cooperation. The concept of self-administration enables the creation of individual knowledge structures for single users as well as for user groups and the development of virtual communities. Mechanisms for social awareness, synchronous whiteboards and cooperative construction of knowledge also form the focus of our research.

sTeam has been developed at the University of Paderborn (Germany) supported by funding of the DFN (Deutsches Forschungs-Netz – german research network).

open-sTeam server

sTeam Server Architecture

Before explaining the server architecture it is important to distinguish between server and web interface. Moreover, there is not just one single webinterface, but possible different clients using the server. This includes our administration interface (sometimes people think of this as the steam system), but also different php interfaces (like BidOWL, openSMT and Sifa – see http://phpsteam.open-steam.org/ for our php interface) and different stylesheet sets (check http://steamware.open-steam.org).

The connection between the server and the steam administration interface is the http protocoll modul of the server and the libxslt module to transformation of steam objects to html code using XSL Stylesheets. The web interface itself is a collection of those Stylesheets and Scripts for execution (this is mostly done through HTML-Formulars, which are send to the server as POST-Requests – these Requests are send to Scripts). For PHP and Java (check http://javasteam.open-steam.org/ ) the COAL-Protocoll handles the connection. For web-applications the PHP/Java-Code is executed within a webserver (usually Apache).

The server itself is the collaboration backend of the application. It can be divided into several parts:

The server is object oriented, with the basic class Object. An Object has many Properties (called Attributes), a unique environment and a list of permissions (ACL).All objects are persistently stored by the server. A database (usually MySQL) is used as the main persistence layer.The server loads different modules, which add functionality to the server (Security, XSLT, LDAP, …). The server starts external services (on the same machine), which are connected by the COAL-Protocol. Those services act independently and if a service fails it is restarted by the server (this behaviour is similar to apache services). Modules and Services interact through Events, which are managed by a global event dispatcher. Groups and Users are special kinds of objects (derived from the Object class). When a request is performed within the server a User become active (user logs in, authorization is checked). Each user can be member of different groups. Each group holds several users and possible other groups (called sub-groups). Permission is usually bound to groups, which are stored inside an objects ACL.

Virtual Knowledge Spaces

The steam server is room-oriented. The unique environment of an object (see above) is usually a room (or a container). A room is a container of objects with connections to other rooms (called Exits or Connections). These connections express semantically related rooms and enable the movement of users from the current environment (room) to the target room. Rooms are also meeting places for users and can be distinguished from containers by this criteria.
Technically, rooms compose a context for users and objects. This is used by events and permissions:

If an action takes place in an object an appropriate event is raised in the objects environment. Therefore, the event can be monitored by subscribing to the environment instead of subscribing to each single object.
If an object is moved to a new environment the permissions of the new environment (room) apply also for the moved object. At the same time, the permissions from the last environment do no longer apply for this object. In both environments the local permissions (bound directly to the moving object) apply.

PHPsTeam

The API is used to interact with the server in php.
For web-applications the PHP/Java-Code is executed within a webserver (usually Apache).

https://github.com/open-steam/phpsteam
(Feel free to explore and contribute.)

JavaSteam

The API “JavaSteam” can be used to interact with a sTeam server using Java.
To communicate with the Server the API uses the COAL Protocol.

Project 0 : My Portfolio App

Required Tasks

  1. Download Android Studio. Check out our mini-course on How to Download Android Studio if you need help.
  2. Create a new project in Android Studio using the “Application with blank activity” template.
  3. Create a layout for your main activity, adding a title, buttons for each app, and a style of your choosing.

    You can begin working in either the text view or design view (whichever you prefer) within Android Studio’s Layout Editor.

    Here is a screenshot of the Design View, for those of you who are new to Android Studio.

    Note that if you start in the design view, it’s often a best practice to return to the text view to make final tweaks as this mode offers the most precision and control over your layout attributes.

    Feel free to use this mockup as a guide:

    portfolio app no toast

Names of your Nanodegree apps

  • Spotify Streamer
  • Super Duo (2 buttons: Football Scores App and Library App)
  • Build It Bigger
  • XYZ Reader
  • Capstone

Colors and Styles

When designing your layout for the project portfolio, you may enjoy customizing the style and color of your buttons and changing the layout. If you are interested in learning about colors you can use, take a look at the material design color page, from Google.

If you’d like your app to look Udacious, feel free to use #F08C35 to match the orange buttons on our site.

  1. In the Java source for your main activity, enable your buttons to respond to click or touch events.
  2. Display a toast within the methods you created in the last step.

    You should see a message like this whenever a button is clicked!

    portfolio_toast

 Review Of the App :

app/src/main/res/layout/content_main.xml

5
<?xml version="1.0" encoding="utf-8"?>
<ScrollView xmlns:android="http://schemas.android.com/apk/res/android"
    xmlns:tools="http://schemas.android.com/tools"
    android:id="@+id/ScrollView01"
    android:layout_width="match_parent"
    android:layout_height="match_parent"
    android:fillViewport="true"
    android:scrollbars="none"
    android:visibility="visible"
    tools:showIn="@layout/activity_main">

<RelativeLayout xmlns:android="http://schemas.android.com/apk/res/android"
    xmlns:app="http://schemas.android.com/apk/res-auto"
    xmlns:tools="http://schemas.android.com/tools"
    android:layout_width="match_parent"
    android:layout_height="match_parent"
    android:paddingBottom="@dimen/activity_vertical_margin"
    android:paddingLeft="@dimen/activity_horizontal_margin"
    android:paddingRight="@dimen/activity_horizontal_margin"
    android:paddingTop="@dimen/activity_vertical_margin"
    app:layout_behavior="@string/appbar_scrolling_view_behavior"
    tools:context="com.example.ajinkyawavare.myappportfolio.MainActivity"
    tools:showIn="@layout/activity_main"
    android:background="#d5f9f7">

    <Button
        android:layout_width="wrap_content"
        android:layout_height="wrap_content"
        android:text="Spotify Streamer"
        android:id="@+id/button"
        android:textSize="20dp"
        android:background="#fab914"
        android:layout_below="@+id/textView"
        android:layout_centerHorizontal="true"
        android:layout_marginTop="38dp" />

    <Button
        android:layout_width="wrap_content"
        android:layout_height="wrap_content"
        android:text="SCORES APP"
        android:id="@+id/button2"
        android:layout_below="@+id/button"
        android:layout_marginTop="34dp"
        android:background="#fab914"
        android:clickable="true"
        android:textSize="20dp"
        android:layout_alignLeft="@+id/button"
        android:layout_alignStart="@+id/button"
        android:layout_alignRight="@+id/button"
        android:layout_alignEnd="@+id/button" />

    <Button
        android:layout_width="wrap_content"
        android:layout_height="wrap_content"
        android:text="LIBRARY APP"
        android:id="@+id/button3"
        android:layout_below="@+id/button2"
        android:layout_marginTop="30dp"
        android:background="#fab914"
        android:clickable="true"
        android:textSize="20dp"
        android:layout_alignLeft="@+id/button2"
        android:layout_alignStart="@+id/button2"
        android:layout_alignRight="@+id/button2"
        android:layout_alignEnd="@+id/button2" />

    <Button
        android:layout_width="wrap_content"
        android:layout_height="wrap_content"
        android:text="BUILD IT BIGGER"
        android:id="@+id/button4"
        android:layout_below="@+id/button3"
        android:layout_marginTop="30dp"
        android:background="#fab914"
        android:clickable="true"
        android:textSize="20dp"
        android:layout_alignLeft="@+id/button3"
        android:layout_alignStart="@+id/button3"
        android:layout_alignRight="@+id/button3"
        android:layout_alignEnd="@+id/button3" />

    <Button
        android:layout_width="wrap_content"
        android:layout_height="wrap_content"
        android:text="XYZ READER"
        android:id="@+id/button5"
        android:layout_marginTop="28dp"
        android:layout_below="@+id/button4"
        android:background="#fab914"
        android:clickable="true"
        android:textSize="20dp"
        android:layout_alignLeft="@+id/button4"
        android:layout_alignStart="@+id/button4"
        android:layout_alignRight="@+id/button4"
        android:layout_alignEnd="@+id/button4" />

    <Button
        android:layout_width="wrap_content"
        android:layout_height="wrap_content"
        android:text="CAPSTONE:MY OWN APP"
        android:id="@+id/button6"
        android:background="#ff0000"
        android:clickable="true"
        android:textSize="20dp"
        android:layout_marginTop="41dp"
        android:layout_below="@+id/button5"
        android:layout_centerHorizontal="true" />

    <TextView
        android:layout_width="wrap_content"
        android:layout_height="wrap_content"
        android:text="My NanoDegree Apps!"
        android:id="@+id/textView"
        android:autoText="false"
        android:textSize="30dp"
        android:textColor="#4fb75d"
        android:layout_alignParentTop="true"
        android:layout_centerHorizontal="true"
        android:layout_marginTop="63dp" />

</RelativeLayout>
</ScrollView>

Suggestion :

1.In order to make all your color values reusable and structural, you can consider to put these color values in res/values/colors.xml file.

2.What you implemented here is already really good. But I still have a little advice here. To avoid repeating your button’s code, you can also define a general Button style and put all general attributes setting in one style definition saved in res/values/styles.xml resource file. And when you want to create button, you can extract it out from this resource file and only write some specific values for each button (for example, android:id, or android:text). By doing so you can make your code cleaner. Try it! :smiley:

app/src/main/java/com/example/ajinkyawavare/myappportfolio/MainActivity.java
2
package com.example.ajinkyawavare.myappportfolio;

import android.os.Bundle;
import android.support.v7.app.AppCompatActivity;
import android.support.v7.widget.Toolbar;
import android.view.Menu;
import android.view.MenuItem;
import android.view.View;
import android.view.View.OnClickListener;
import android.widget.Button;
import android.widget.Toast;

public class MainActivity extends AppCompatActivity {

    private Button button;
    private Button button2;
    private Button button3;
    private Button button4;
    private Button button5;
    private Button button6;

    @Override
    protected void onCreate(Bundle savedInstanceState) {
        super.onCreate(savedInstanceState);
        setContentView(R.layout.activity_main);
        Toolbar toolbar = (Toolbar) findViewById(R.id.toolbar);
        setSupportActionBar(toolbar);

        /*FloatingActionButton fab = (FloatingActionButton) findViewById(R.id.fab);
        fab.setOnClickListener(new View.OnClickListener() {
            @Override
            public void onClick(View view) {
                Snackbar.make(view, "Replace with your own action", Snackbar.LENGTH_SHORT)
                        .setAction("Action", null).show();
            }
        });
*/
        button = (Button)findViewById(R.id.button);
        button.setOnClickListener(new OnClickListener() {

            @Override
            public void onClick(View arg0) {

                Toast.makeText(getApplicationContext(),
                        "This Button will launch my Spotify Streamer App!", Toast.LENGTH_SHORT).show();

            }
        });
        button2 = (Button)findViewById(R.id.button2);
        button2.setOnClickListener(new OnClickListener() {

            @Override
            public void onClick(View arg0) {

                Toast.makeText(getApplicationContext(),
                        "This Button will launch my Scores App!", Toast.LENGTH_SHORT).show();

            }
        });
        button3 = (Button)findViewById(R.id.button3);
        button3.setOnClickListener(new OnClickListener() {

            @Override
            public void onClick(View arg0) {

                Toast.makeText(getApplicationContext(),
                        "This Button will launch my Library App!", Toast.LENGTH_SHORT).show();

            }
        });
        button4 = (Button)findViewById(R.id.button4);
        button4.setOnClickListener(new OnClickListener() {

            @Override
            public void onClick(View arg0) {

                Toast.makeText(getApplicationContext(),
                        "This Button will launch my Build It Bigger App!", Toast.LENGTH_SHORT).show();

            }
        });
        button5 = (Button)findViewById(R.id.button5);
        button5.setOnClickListener(new OnClickListener() {

            @Override
            public void onClick(View arg0) {

                Toast.makeText(getApplicationContext(),
                        "This Button will launch my XYZ Reader App!", Toast.LENGTH_SHORT).show();

            }
        });
        button6 = (Button)findViewById(R.id.button6);
        button6.setOnClickListener(new OnClickListener() {

            @Override
            public void onClick(View arg0) {

                Toast.makeText(getApplicationContext(),
                        "This Button will launch my Capstone:My Own App!", Toast.LENGTH_SHORT).show();

            }
        });

    }

    @Override
    public boolean onCreateOptionsMenu(Menu menu) {
        // Inflate the menu; this adds items to the action bar if it is present.
        getMenuInflater().inflate(R.menu.menu_main, menu);
        return true;
    }

    @Override
    public boolean onOptionsItemSelected(MenuItem item) {
        // Handle action bar item clicks here. The action bar will
        // automatically handle clicks on the Home/Up button, so long
        // as you specify a parent activity in AndroidManifest.xml.
        int id = item.getItemId();

        //noinspection SimplifiableIfStatement
        if (id == R.id.action_settings) {
            return true;
        }

        return super.onOptionsItemSelected(item);
    }
}

Suggestion :

1.Since from your codes, I can see that you are a really advanced student, in order to learn more, you could also check a package called “butterknife”. In the future, you can find and automatically cast the corresponding view in your layout easily. This will save you a lot of time. :smiley:
Supp:
http://jakewharton.github.io/butterknife/
Also, a video tutorial:
https://www.skillfeed.com/zh/courses/11756-android-butter-knife-the-complete-guide
2.

To learn more, you can also register function for your buttons using XML definition like this sample code:

<Button
     android:onClick="onClick" />

app/build.gradle

// Top-level build file where you can add configuration options common to all sub-projects/modules.

buildscript {
    repositories {
        jcenter()
    }
    dependencies {
        classpath 'com.android.tools.build:gradle:1.5.0'

        // NOTE: Do not place your application dependencies here; they belong
        // in the individual module build.gradle files
    }
}

allprojects {
    repositories {
        jcenter()
    }
}

task clean(type: Delete) {
    delete rootProject.buildDir
}
Yes great! You have your minSdkVersion value set to 15, this can make your app be able to run on most of the Android devices (96%). In the meantime, you can gain most of the latest powerful features of Android 4.X. Great job here!
Supp: https://developer.android.com/about/dashboards/index.html?utm_source=suzunone
app/src/main/res/layout/activity_main.xml
<?xml version="1.0" encoding="utf-8"?>
<android.support.design.widget.CoordinatorLayout xmlns:android="http://schemas.android.com/apk/res/android"
    xmlns:app="http://schemas.android.com/apk/res-auto"
    xmlns:tools="http://schemas.android.com/tools"
    android:layout_width="match_parent"
    android:layout_height="match_parent"
    android:fitsSystemWindows="true"
    tools:context="com.example.ajinkyawavare.myappportfolio.MainActivity">

    <android.support.design.widget.AppBarLayout
        android:layout_width="match_parent"
        android:layout_height="wrap_content"
        android:theme="@style/AppTheme.AppBarOverlay">

        <android.support.v7.widget.Toolbar
            android:id="@+id/toolbar"
            android:layout_width="match_parent"
            android:layout_height="?attr/actionBarSize"
            android:background="?attr/colorPrimary"
            app:popupTheme="@style/AppTheme.PopupOverlay" />

    </android.support.design.widget.AppBarLayout>

    <include layout="@layout/content_main" />

<!--
    <android.support.design.widget.FloatingActionButton
        android:id="@+id/fab"
        android:layout_width="wrap_content"
        android:layout_height="wrap_content"
        android:layout_gravity="bottom|end"
        android:layout_margin="@dimen/fab_margin"
        android:src="@android:drawable/ic_dialog_email" />
-->

</android.support.design.widget.CoordinatorLayout>

Arrays Introduction

Problem Statement

An array is a series of elements of the same type placed in contiguous memory locations that can be individually referenced by adding an index to a unique identifier.

Declaration:Movie Fifty Shades Darker (2017)

int arr[10]; //Declares an array named arr of size 10, i.e; you can store 10  integers.

Accessing elements of an array:

Indexing in arrays starts from 0.So the first element is stored at arr[0],the second element at arr[1]...arr[9]

You’ll be an given array of N integers and you have to print the integers in the reverse order.

Input Format

The first line of the input contains N,where N is the number of integers.The next line contains N integers separated by a space.

Constraints

1<=N<=1000

1<=Ai<=10000, where Ai is the ith integer in the array.

Output Format

Print the N integers of the array in the reverse order in a single line separated by a space.

Sample Input

4
1 4 3 2

Sample Output

2 3 4 1

Solution

  
#include <cmath>
#include <cstdio>
#include <vector>
#include <iostream>
#include <algorithm>
using namespace std;


int main() {
    /* Enter your code here. Read input from STDIN. Print output to STDOUT */   
    int n,i,a[max];
    cin>>n;
    for(i=0;i<n;i++)
        cin>>a[i];
    for(i=n-1;i>=0;i--)
        cout<<a[i]<<" ";
    return 0;
}


Input and Output

Problem Statement

For any program that we write the basic things that we need to do is take the input and print the expected output.

In C++ you can take the input using cin and print the output using cout.Unlike C where you need the format specifier in printf and scanf, here you can use cin and cout.

Taking Input:

If you want to input a number: cin>>n ,  where n is the number.
If you want to input a number and a string: cin>>n>>s, where s is the string.

Printing output:

If you want to output a single number: cout<<n
If you want to output a number and a string separated by a new line: cout<<n<<endl<<s (where endl moves the pinter to the new line and then string gets printed.)

Take three numbers as inputs and print the sum of the three numbers.

Input Format

The first line of the input contains three integers A,B and C.

1A,B,C1000

Output Format

In a single line print the sum of the three numbers.

Sample Input

1 2 7

Sample Output

10

Explanation

Sum of the three numbers 1,2 and 7 is 10.

Solution

  
#include <cmath>
#include <cstdio>
#include <vector>
#include <iostream>
#include <algorithm>
using namespace std;


int main() {
    /* Enter your code here. Read input from STDIN. Print output to STDOUT */
    int a,b,c;
    cin>>a>>b>>c;
    cout<<a+b+c;
    return 0;
}

Flipping bits

Problem Statement

You will be given a list of 32 bits unsigned integers. You are required to output the list of the unsigned integers you get by flipping bits in its binary representation (i.e. unset bits must be set, and set bits must be unset).

Input Format

The first line of the input contains the list size T, which is followed by T lines, each line having an integer from the list.

Constraints

1T100
0integer<232

Output Format

Output one line per element from the list with the requested result.

Sample Input

3 
2147483647 
1 
0

Sample Output

2147483648 
4294967294 
4294967295

Explanation

Take 1 for example, as unsigned 32-bits is 00000000000000000000000000000001 and doing the flipping we get 11111111111111111111111111111110 which in turn is 4294967294.

Solution

  
#include <cmath>
#include <cstdio>
#include <vector>
#include <iostream>
#include <algorithm>
using namespace std;


int main() {
    /* Enter your code here. Read input from STDIN. Print output to STDOUT */
    int t,n;
    unsigned int a;
    cin>>t;
    while(t--)
    {
        cin>>a;
        cout<<~a<<endl;      
    }
    return 0;
    
}


Funny String

Problem Statement

Suppose you have a string S which has length N and is indexed from 0 to N1. String R is the reverse of the string S. The string S is funny if the condition |SiSi1|=|RiRi1| is true for every i from 1 to N1.

(Note: Given a string str, stri denotes the ascii value of the ith character (0-indexed) of str. |x| denotes the absolute value of an integer x)

Input Format

First line of the input will contain an integer T. T testcases follow. Each of the next T lines contains one string S.

Constraints

  • 1<=T<=10
  • 2<=length of S<=10000

Output Format

For each string, print Funny or Not Funny in separate lines.

Sample Input

2
acxz
bcxz

Sample Output

Funny
Not Funny

Explanation

Consider the 1st testcase acxz

here

|c-a| = |x-z| = 2
|x-c| = |c-x| = 21
|z-x| = |a-c| = 2

Hence Funny.

Consider the 2nd testcase bcxz

here

|c-b| != |x-z|

Hence Not Funny.

Solution

  
#include <cmath>
#include <cstdio>
#include <vector>
#include <iostream>
#include <algorithm>
using namespace std;


int main() {
    /* Enter your code here. Read input from STDIN. Print output to STDOUT */ 
    int t,count;
    string s,r;
    cin>>t;
    while(t--)
    {
        count=0;
        r.clear();
        s.clear();
        cin>>s;
        r=s;
        reverse(r.begin(),r.end());
        for(int i=1;i<s.length();i++)
        {
            if(abs(s[i]-s[i-1])==abs(r[i]-r[i-1]))
            {
                count++;
            }
        }
        if(count==(s.length()-1))
            cout<<"Funny"<<endl;
        else cout<<"Not Funny"<<endl;
    }
    return 0;
}