- Open a text editor
- Copy and paste the following text into the editor:
[Desktop Entry]Version=1.0Name=EclipseComment=Java IDE<br>Type=ApplicationCategories=Development;IDE;Exec=/home/{username}/Programs/eclipse/eclipse<br>Terminal=falseStartupNotify=trueIcon=/home/{username}/Programs/eclipse/icon.xpmName[en_US]=Eclipse - Update any paths if you extracted Eclipse to a different location
- Save the file as eclipse.desktop in /home/{username}/.local/share/applications/
- Reboot your machine
- Search for Eclipse
- Drag and drop the Eclipse icon to the launcher
Category: Linux
Linux or GNU/Linux is a free and open source software Unix-like operating system for computers. Linux is Free and open source software (FOSS). Free and open source software (FOSS) means that everyone has the freedom to use it, see how it works, change it or share it.
Install Komodo IDE in ubuntu
Komodo IDE is used for dynamic coding languages which has features derived from the embedded python interpreter.
Komodo Edit in Ubuntu.
sudo add-apt-repository ppa:mystic-mirage/komodo-edit
sudo apt-get update
sudo apt-get install komodo-edit
Source: Komodo IDE – Wikipedia.
Add Sublime Text in Ubuntu
Install via the Package Manager(apt-get):
Simply add to your packages:
For Sublime-Text-2:
sudo add-apt-repository ppa:webupd8team/sublime-text-2
sudo apt-get update
sudo apt-get install sublime-text
For Sublime-Text-3:
sudo add-apt-repository ppa:webupd8team/sublime-text-3
sudo apt-get update
sudo apt-get install sublime-text-installer
Display Two Windows as Split Screen
To let the window occupy the left half of the screen use this:
Ctrl + Windows + ←
For the right half:
Ctrl + Windows + →
Data Recovery: Photo Rec step by step.
Run PhotoRec executable
If PhotoRec is not yet installed, it can be downloaded from TestDisk Download. Extract the files from the archive including the sub-directories.
To recover files from hard disk, USB key, Smart Card, CD-ROM, DVD, etc., you need enough rights to access the physical device.
 Under DOS, run
 photorec.exe Under Windows, start PhotoRec (ie
 testdisk-6.13/photorec_win.exe) from an account in the Administrator group. Under Windows Vista or later, right click photorec_win.exe and then clickRun as administratorto launch PhotoRec. Under Unix/Linux/BSD, you need to be root to run PhotoRec (ie.
 sudo testdisk-6.13/photorec_static) Under Mac OS X, start PhotoRec (ie
 testdisk-6.13/photorec). If you are not root, PhotoRec will restart itself using sudo after a confirmation on your part. Sudo will ask for a password – enter your Mac OS X user password. Under OS/2, PhotoRec doesn’t handle physical devices, only disk images. Sorry.
To recover files from a media image, run
photorec image.ddto carve a raw disk imagephotorec image.E01to recover files from an Encase EWF imagephotorec 'image.???'if the Encase image is split into several files.photorec '/cygdrive/d/evidence/image.???'if the Encase image is split into several files in the directory d:\evidence
![]()
![]() Most devices should be autodetected including Linux software RAID (that is,
Most devices should be autodetected including Linux software RAID (that is, /dev/md0) and file system encrypted with cryptsetup, dm-crypt, LUKS or TrueCrypt (ie. /dev/mapper/truecrypt0). To recover files from other devices, run photorec device.
Forensics users can use the parameter /log to create a log file named photorec.log; it records the location of the files recovered by PhotoRec.
Disk selection
 |
Available media are listed. Use up/down arrow keys to select the disk that holds the lost files. Press Enter to proceed.
![]() If available, use the raw device,
If available, use the raw device, /dev/rdisk* instead of /dev/disk* for faster data transfer.
Source partition selection
 |
Choose
Searchafter selecting the partition that holds the lost files to start the recovery,Optionsto modify the options,File Optto modify the list of file types recovered by PhotoRec.
PhotoRec options
 |
ParanoidBy default, recovered files are verified and invalid files rejected.
Enable bruteforce if you want to recover more fragmented JPEG files, note it is a very CPU intensive operation.
Allow partial last cylindermodifies how the disk geometry is determined – only non-partitioned media should be affected.- The
expert modeoption allows the user to force the file system block size and the offset. Each filesystem has his own block size (a multiple of the sector size) and offset (0 for NTFS, exFAT, ext2/3/4), these value are fixed when the filesystem has been created/formated. When working on the whole disk (ie. original partitions are lost) or a reformated partition, if PhotoRec has found very few files, you may want to try the minimal value that PhotoRec let you select (it’s the sector size) for the block size (0 will be used for the offset). - Enable
Keep corrupted filesto keep files even if they are invalid in the hope that data may still be salvaged from an invalid file using other tools. - Enable
Low memoryif your system does not have enough memory and crashes during recovery. It may be needed for large file systems that are heavily fragmented. Do not use this option unless absolutely necessary.
Selection of files to recover
 |
In FileOpts, enable or disable the recovery of certain file types, for example,
[X] riff RIFF audio/video: wav, cdr, avi
...
[X] tif  Tag Image File Format and some raw file formats (pef/nef/dcr/sr2/cr2)
...
[X] zip  zip archive including OpenOffice and MSOffice 2007
The whole list of file formats recovered by PhotoRec contains more than 300 file families representing more than 480 file extensions.
File system type
 |
Once a partition has been selected and validated with Search, PhotoRec needs to know how the data blocks are allocated. Unless it is an ext2/ext3/ext4 filesystem, choose Other.
Carve the partition or unallocated space only
 |
PhotoRec can search files from
- from the whole partition (useful if the filesystem is corrupted) or
- from the unallocated space only (available for ext2/ext3/ext4, FAT12/FAT16/FAT32 and NTFS). With this option only deleted files are recovered.
Select where recovered files should be written
 |
Choose the directory where the recovered files should be written.
- To get the drive list (C:, D:, E:, etc.), use the arrow keys to select
.., press theEnterkey – repeat until you can select the drive of your choice. Validate withYes when you get the expected destination. - File system from external disk may be available in a
/media,/mntor/run/mediasub-directory. Mount your destination drive if necessary. - Partitions from external disk are usually mounted in
/Volumes.
Recovery in progress
 |
Number of recovered files is updated in real time.
- During pass 0, PhotoRec searches the first 10 files to determine the blocksize.
- During pass 1 and later, files are recovered including some fragmented files.
Recovered files are written in recup_dir.1, recup_dir.2… sub-directories. It’s possible to access the files even if the recovery is not finished.
Recovery is completed
 |
When the recovery is complete, a summary is displayed. Note that if you interrupt the recovery, the next time PhotoRec is restarted you will be asked to resume the recovery.
- Thumbnails found inside pictures are saved as
t*.jpg - If you have chosen to keep corrupted files/file fragments, their filenames will beginning by the letter
b(roken). - Hint: When looking for a specific file. Sort your recovered files by extension and/or date/time. PhotoRec uses time information (metadata) when available in the file header to set the file modification time
- After Using PhotoRec: Some ideas to sort recovered files or repair broken ones.
- You may have disabled your live antivirus protection during the recovery to speed up the process, but it’s recommended to scan the recovered files for viruses before opening them – PhotoRec may have undeleted an infected document or a trojan.
Source: http://www.cgsecurity.org/wiki/PhotoRec_Step_By_Step
Data Recovery: Test Disk Installation
You can install testdisk with apt-get
First, you have to enable the universe repository

Then update and install:
sudo apt-get update
sudo apt-get install testdisk
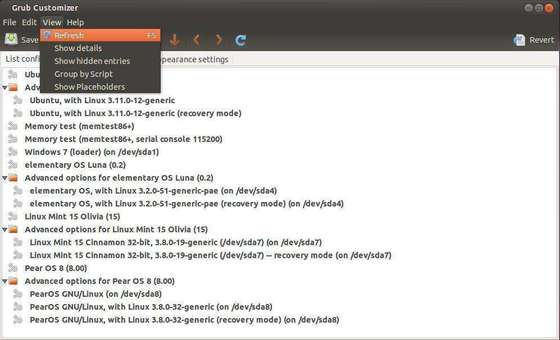
Grub Customizer
Grub Customizer is a graphical tool for managing the Grub boot entries in Ubuntu Linux.
With it, you can set the default OS, add/remove boot entries, change boot order, set an background image, and more.
This simple tutorial is going to show you how to install the Grub Customizer in Ubuntu 14.04 Trusty Tahr from the developer’s PPA.
To get started:
press Ctrl+Alt+T on keyboard to open the terminal. When it opens, paste the commands below and run one by one:
sudo add-apt-repository ppa:danielrichter2007/grub-customizer

sudo apt-get update

sudo apt-get install grub-customizer
Once done, you’re able to open this tool from the Unity Dash or application menu. Enjoy!
Source: www.ubuntuhandbook.com
Boot Repair – Grub 2
Ubuntu and many other Linux distributions use the GRUB2 boot loader. If GRUB2 breaks — for example, if you install Windows after installing Ubuntu or overwrite your MBR — you won’t be able to boot into Ubuntu.
You can easily restore GRUB2 from a Ubuntu live CD or USB drive. This process is different from restoring the legacy GRUB boot loader on older Linux distributions.
Graphical Method – Boot Repair
Boot Repair is a graphical tool that can repair GRUB2 with a single click. This is the ideal solution to boot problems for most users.
If you have the media you installed Ubuntu from, insert it into your computer and restart. If you don’t, download a Ubuntu live CD and burn it to a disc or install it on a USB flash drive. You can also download a dedicated Boot Repair live CD.
After booting into the live Ubuntu environment, open a terminal from the Dash and run the following commands to install Boot Repair:
sudo apt-add-repository ppa:yannubuntu/boot-repair
sudo apt-get update
sudo apt-get install -y boot-repair
boot-repair

The Boot Repair window will appear after you run the boot-repair command. After it scans your system, click the Recommended repair button to repair GRUB2 with a single click.

You can also click the Advanced options header to customize GRUB2’s options without learning its command-line syntax.

Restart your computer after using the Boot Repair tool. Ubuntu should boot up normally.
Terminal Method
If you’d rather get your hands dirty, you can do this yourself from a terminal. You’ll need to boot from a live CD or USB drive, as in the graphical method above. Ensure the version of Ubuntu on the CD is the same as the version of Ubuntu installed on your computer — for example, if you have Ubuntu 12.04 installed, ensure you use a Ubuntu 12.04 live CD.
Open a terminal after booting into the live environment. Identify the partition Ubuntu is installed on using one of the following commands:
sudo fdisk -l
sudo blkid
Here’s the output of both commands. In the fdisk -l command, the Ubuntu partition is identified by the word Linux in the System column. In the blkid command, the partition is identified by its ext4 file system.

Run the following command to mount the Ubuntu partition at /mnt, replacing /dev/sdX# with the device name of your Ubuntu partition from the above commands:
sudo mount /dev/sdX# /mnt
For example, use /dev/sda1 for the first partition of the first hard disk device.

Important: If you have a separate boot partition, skip the above command and mount the boot partition at /mnt/boot. If you don’t know whether you have a separate boot partition, you probably don’t.
Run the following command to reinstall grub from the live CD, replacing /dev/sdX with the device name of the hard disk above. Omit the number. For example, if you used /dev/sda1 above, use /dev/sda here.
sudo grub-install –boot-directory=/mnt/boot /dev/sdX

Restart your computer and Ubuntu should boot properly.
Source: http://www.howtogeek.com/114884/how-to-repair-grub2-when-ubuntu-wont-boot/
https://askubuntu.com/questions/549172/how-to-install-windows-8-1-under-virtualbox-in-ubuntu
Recover, Restore or Reinstall Grub
Grub 2 typically gets overridden when you install Windows or another Operating System. To make Ubuntu control the boot process, you need Reinstall (Repair/Restore) Grub using a Ubuntu Live CD.
Terminal Commands
Mount the partition your Ubuntu Installation is on. If you are not sure which it is, launch GParted (included in the Live CD) and find out. It is usually a EXT4 Partition. Replace the XY with the drive letter, and partition number, for example: sudo mount /dev/sda1 /mnt.
sudo mount /dev/sdXY /mnt
Now bind the directories that grub needs access to to detect other operating systems, like so.Watch movie online Get Out (2017)
sudo mount --bind /dev /mnt/dev &&
sudo mount --bind /dev/pts /mnt/dev/pts &&
sudo mount --bind /proc /mnt/proc &&
sudo mount --bind /sys /mnt/sys
sudo chroot /mnt
Now install, check, and update grub.
This time you only need to add the drive letter (usually a) to replace X, for example: grub-install /dev/sda, grub-install –recheck /dev/sda.
grub-install /dev/sdX
grub-install --recheck /dev/sdX
update-grub
Now grub is back, all that is left is to exit the chrooted system and unmount everything.
exit &&
sudo umount /mnt/sys &&
sudo umount /mnt/proc &&
sudo umount /mnt/dev/pts &&
sudo umount /mnt/dev &&
sudo umount /mnt
Shut down and turn your computer back on, and you will be met with the default Grub2 screen.
Mount system using Live CD
Mount the partition your Ubuntu Installation is on. If you are not sure which it is, launch GParted (included in the Live CD) and find out. It is usually a EXT4 Partition. Replace the XY with the drive letter, and partition number, for example: sudo mount /dev/sda1 /mnt.
sudo mount /dev/sdXY /mnt

Press Ctrl-Alt-F1

sudo mount /dev/sda1 /mnt

sudo mount --bind /dev /mnt/dev

sudo mount --bind /proc /mnt/proc

sudo mount --bind /sys /mnt/sys

sudo chroot /mnt