Grub Customizer

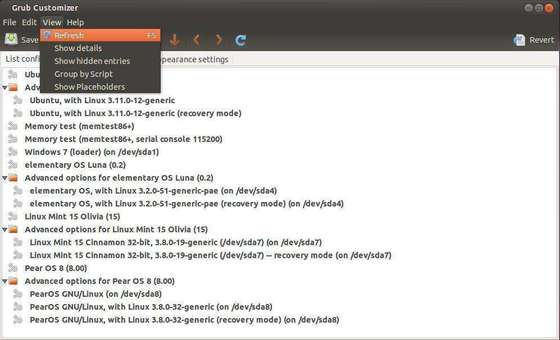
Grub Customizer is a graphical tool for managing the Grub boot entries in Ubuntu Linux.

With it, you can set the default OS, add/remove boot entries, change boot order, set an background image, and more.

This simple tutorial is going to show you how to install the Grub Customizer in Ubuntu 14.04 Trusty Tahr from the developer’s PPA.

Grub Customizer 4.0

To get started:

press Ctrl+Alt+T on keyboard to open the terminal. When it opens, paste the commands below and run one by one:

sudo add-apt-repository ppa:danielrichter2007/grub-customizer

sudo apt-get update

sudo apt-get install grub-customizer

Once done, you’re able to open this tool from the Unity Dash or application menu. Enjoy!

Source: www.ubuntuhandbook.com

Boot Repair – Grub 2

Ubuntu and many other Linux distributions use the GRUB2 boot loader. If GRUB2 breaks — for example, if you install Windows after installing Ubuntu or overwrite your MBR — you won’t be able to boot into Ubuntu.

You can easily restore GRUB2 from a Ubuntu live CD or USB drive. This process is different from restoring the legacy GRUB boot loader on older Linux distributions.

Graphical Method – Boot Repair

Boot Repair is a graphical tool that can repair GRUB2 with a single click. This is the ideal solution to boot problems for most users.

If you have the media you installed Ubuntu from, insert it into your computer and restart. If you don’t, download a Ubuntu live CD and burn it to a disc or install it on a USB flash drive. You can also download a dedicated Boot Repair live CD.

After booting into the live Ubuntu environment, open a terminal from the Dash and run the following commands to install Boot Repair:

sudo apt-add-repository ppa:yannubuntu/boot-repair
sudo apt-get update
sudo apt-get install -y boot-repair
boot-repair

image

The Boot Repair window will appear after you run the boot-repair command. After it scans your system, click the Recommended repair button to repair GRUB2 with a single click.

image

You can also click the Advanced options header to customize GRUB2’s options without learning its command-line syntax.

image

Restart your computer after using the Boot Repair tool. Ubuntu should boot up normally.

Terminal Method

If you’d rather get your hands dirty, you can do this yourself from a terminal. You’ll need to boot from a live CD or USB drive, as in the graphical method above. Ensure the version of Ubuntu on the CD is the same as the version of Ubuntu installed on your computer — for example, if you have Ubuntu 12.04 installed, ensure you use a Ubuntu 12.04 live CD.

Open a terminal after booting into the live environment. Identify the partition Ubuntu is installed on using one of the following commands:

sudo fdisk -l
sudo blkid

Here’s the output of both commands. In the fdisk -l command, the Ubuntu partition is identified by the word Linux in the System column. In the blkid command, the partition is identified by its ext4 file system.

image

Run the following command to mount the Ubuntu partition at  /mnt, replacing /dev/sdX# with the device name of your Ubuntu partition from the above commands:

sudo mount /dev/sdX# /mnt

For example, use /dev/sda1 for the first partition of the first hard disk device.

image

Important: If you have a separate boot partition, skip the above command and mount the boot partition at /mnt/boot. If you don’t know whether you have a separate boot partition, you probably don’t.

Run the following command to reinstall grub from the live CD, replacing /dev/sdX with the device name of the hard disk above. Omit the number. For example, if you used /dev/sda1 above, use /dev/sda here.

sudo grub-install –boot-directory=/mnt/boot /dev/sdX

image

Restart your computer and Ubuntu should boot properly.

Source: http://www.howtogeek.com/114884/how-to-repair-grub2-when-ubuntu-wont-boot/
https://askubuntu.com/questions/549172/how-to-install-windows-8-1-under-virtualbox-in-ubuntu
Recover, Restore or Reinstall Grub

Grub 2 typically gets overridden when you install Windows or another Operating System. To make Ubuntu control the boot process, you need Reinstall (Repair/Restore) Grub using a Ubuntu Live CD.

Terminal Commands

Mount the partition your Ubuntu Installation is on. If you are not sure which it is, launch GParted (included in the Live CD) and find out. It is usually a EXT4 Partition. Replace the XY with the drive letter, and partition number, for example: sudo mount /dev/sda1 /mnt.

sudo mount /dev/sdXY /mnt

Now bind the directories that grub needs access to to detect other operating systems, like so.Watch movie online Get Out (2017)


sudo mount --bind /dev /mnt/dev &&
sudo mount --bind /dev/pts /mnt/dev/pts &&
sudo mount --bind /proc /mnt/proc &&
sudo mount --bind /sys /mnt/sys
sudo chroot /mnt

Now install, check, and update grub.

This time you only need to add the drive letter (usually a) to replace X, for example: grub-install /dev/sda, grub-install –recheck /dev/sda.


grub-install /dev/sdX
grub-install --recheck /dev/sdX
update-grub

Now grub is back, all that is left is to exit the chrooted system and unmount everything.


exit &&
sudo umount /mnt/sys &&
sudo umount /mnt/proc &&
sudo umount /mnt/dev/pts &&
sudo umount /mnt/dev &&
sudo umount /mnt

Shut down and turn your computer back on, and you will be met with the default Grub2 screen.

Mount system using Live CD

Mount the partition your Ubuntu Installation is on. If you are not sure which it is, launch GParted (included in the Live CD) and find out. It is usually a EXT4 Partition. Replace the XY with the drive letter, and partition number, for example: sudo mount /dev/sda1 /mnt.

sudo mount /dev/sdXY /mnt

Press Ctrl-Alt-F1

sudo mount /dev/sda1 /mnt

sudo mount --bind /dev /mnt/dev

sudo mount --bind /proc /mnt/proc

sudo mount --bind /sys /mnt/sys

sudo chroot /mnt

Live CD Recovery: Update Failure

Update Failure

If there was an update that made your system non-bootable and they have fixed it in the repositories, you can use the Live CD to run apt-get to get the new files to fix your system.

  1. Boot the Ubuntu Live CD.
  2. Press Ctrl-Alt-F1

  3. sudo mount /dev/sda1 /mnt

  4. sudo mount --bind /dev /mnt/dev

  5. sudo mount --bind /proc /mnt/proc

  6. sudo mount --bind /sys /mnt/sys

  7. sudo chroot /mnt

  8. apt update

  9. apt upgrade

If you have trouble accessing your network after chroot, you probably use DHCP and can work around this by adding OpenDNS name servers to your /etc/resolv.conf after you use chroot:

nameserver 208.67.222.222
nameserver 208.67.220.220

Live CD Recovery : Lost Password

Lost Password

Here is how you can use the Live CD to change the administrative password on your machine if you have lost/forgot the current password. Please note that you can usually boot into RecoveryMode and run the passwd command directly.

  1. Boot the Ubuntu Live CD.
  2. Press Ctrl-Alt-F1

  3. sudo mount /dev/sda1 /mnt

  4. If you created a custom partition layout when installing Ubuntu you have to find your root partition using the fdisk utility. See the section Finding your root partition.

  5. sudo chroot /mnt

You can now use the passwd command to reset a password.

Note: In the mount command, /dev/sda1 will need to be replaced with the partition where the root of the file system resides.

Network Manager shows eth0 and wlan0 unmanaged

After starting the OS, there is no internet connectivity. The network manager shows that eth0 and wlan0 are not managed.

Make sure that the eth0 and wlan0 are discovered. Run the following command.

ifconfig -a

If the ethernet and wlan can be seen in the output but no ip address is allocated to it, check if the dns nameserver exists.

sudo gedit /etc/resolv.conf

If this list is empty then add the following entries in it.

# Dynamic resolv.conf(5) file for glibc resolver(3) generated by resolvconf(8)
#     DO NOT EDIT THIS FILE BY HAND -- YOUR CHANGES WILL BE OVERWRITTEN
nameserver 8.8.8.8
nameserver 8.8.4.4

These point to the Google DNS.

Try to ping any website. Example:-

ping www.google.com

If the result is successful we have a working conncetion.

If ping fails, then the system doesn’t manage the network drivers.

For the system to manage the network devices, we have to make changes in the /etc/NetworkManager/NetworkManager.conf file

sudo gedit /etc/NetworkManager/NetworkManager.conf file

The displayed output will be in the format:-

[main]
plugins=ifupdown,keyfile,ofono
dns=dnsmasq

no-auto-default=XX:XX:XX:XX:XX:XX,

[ifupdown]
managed=false

Change the managed value from false to true

[main]
plugins=ifupdown,keyfile,ofono
dns=dnsmasq

no-auto-default=XX:XX:XX:XX:XX:XX,

[ifupdown]
managed=true

Restart the network service

sudo service networking restart.

Boot Delay due to Wait for Network Configuration

This problem happens sometimes when ubuntu starts up. You can’t really boot to the interface sometimes.

Splash Screen with the 5 dots and a message saying:

waiting for network configuration

followed by:

waiting an additional 60 seconds for network configuration

Solution to this problem is following :

In /etc/network/interfaces this changes all interfaces (except lo) from auto to allow-hotplug. This way the boot is no more waiting for the interfaces to come up first.Example before (look at auto eth0):

auto lo
iface lo inet loopback

# The primary network interface
auto eth0
iface eth0 inet dhcp

auto wlan0
iface wlan0 inet dhcp

Example after (look at allow-hotplug eth0):

auto lo
iface lo inet loopback

# The primary network interface
allow-hotplug eth0
iface eth0 inet dhcp

auto wlan0
allow-hotplug wlan0
iface wlan0 inet dhcp


Install Build-Essential

Informational list of build-essential packages

Other Packages Related to build-essential

  • dpkg-dev (>= 1.17.11)
    Debian package development tools
  • g++ (>= 4:5.2)
    GNU C++ compiler
  • gcc (>= 4:5.2)
    GNU C compiler
  • libc6-dev
    GNU C Library: Development Libraries and Header Files
    or libc-dev
    virtual package provided by libc6-dev
  • make
    utility for directing compilation
    also a virtual package provided by make-guile
    To Install the build-essential package:
    sudo apt-get update
    sudo apt-get install build-essential